What is the Buttonhole Spacing Calculator?
This tool helps sewists, tailors and DIY garment makers place buttonholes evenly along a placket, shirt front, cuff or waistband. Instead of guessing or eyeballing, you enter the total length of the opening, how far the first and last buttonhole should sit from each end (the margin), and how many buttons you want. It returns the exact center-to-center spacing so your buttons line up perfectly.
How to use it
Measure the full length of the area where buttons will go (for example, the length of a shirt placket). Decide on an equal margin from each end — this keeps the top and bottom buttons from sitting right at the edge. Enter the number of buttons (minimum two). The calculator divides the usable length between the buttons and reports the gap between each one, plus where to mark the first buttonhole.
The formula explained
The usable distance is the total length minus both end margins: \(L - 2m\). With \(n\) buttons there are \(n - 1\) equal gaps between them, so each gap is \((L - 2m) / (n - 1)\). The first buttonhole sits at the margin distance from the top edge, and every following one is spaced by that gap.
$$\text{Spacing} = \frac{\text{Total Length} - 2 \times \text{End Margin}}{\text{Number of Buttons} - 1}$$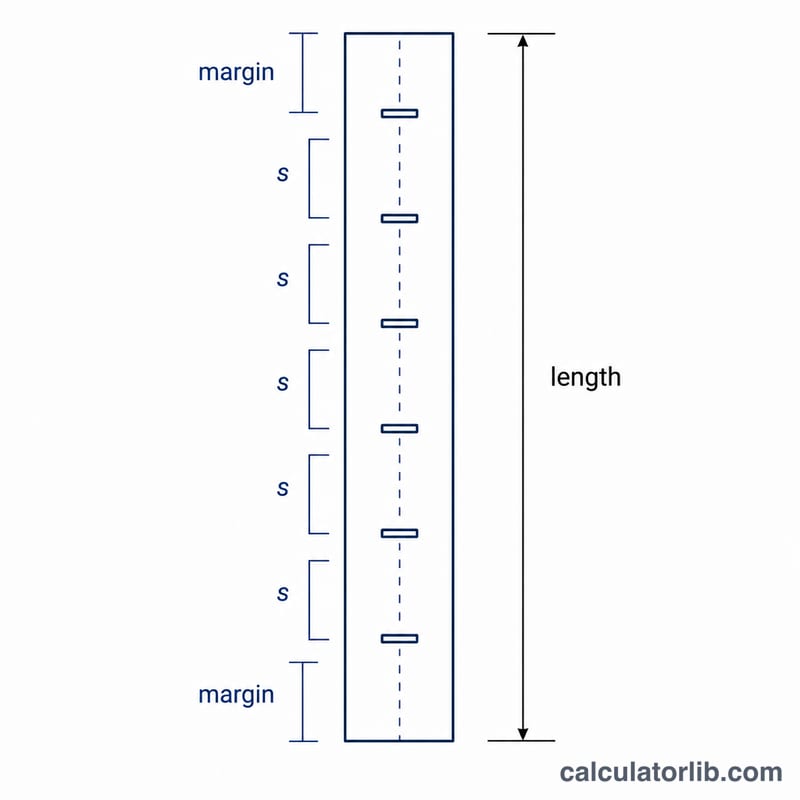
Worked example
Suppose a shirt placket is 40 cm long, you want a 2 cm margin at top and bottom, and 6 buttons. Usable length = \(40 - 2\times2 = 36\) cm. Gaps = \(6 - 1 = 5\). Spacing = \(36 \div 5 = 7.2\) cm. So mark the first buttonhole 2 cm from the top, then every 7.2 cm after that, landing the last one 2 cm from the bottom.
$$\text{Spacing} = \frac{40 - 2 \times 2}{6 - 1} = \frac{36}{5} = 7.2\ \text{cm}$$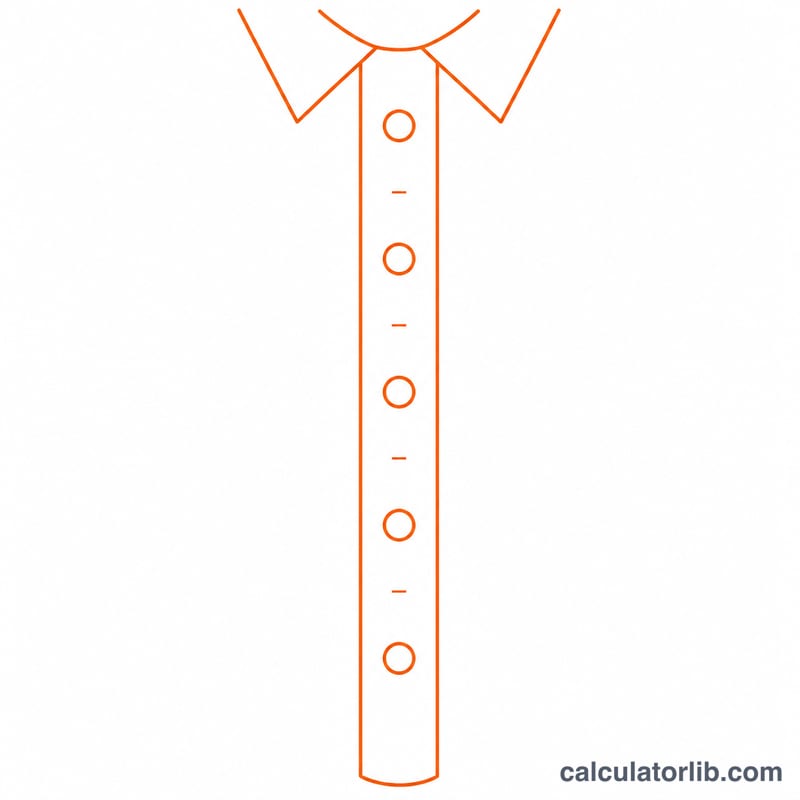
Practical Buttonhole Placement Tips
- Round to a practical mark. A computed spacing like 10.83 cm is hard to measure repeatedly. Round to the nearest comfortable increment (e.g. 11 cm) and absorb the tiny difference in the end margins so it stays symmetric.
- Place a stress-point button at the bust line. On blouses and shirts, set one button at the fullest part of the bust first, then space the remaining buttons evenly above and below it to prevent gaping.
- Mark from both ends and meet in the middle. Measure the first margin from the top and the last from the bottom, then fill in between. If your marks don't meet symmetrically, recheck before cutting.
- Allow buttonhole length beyond button diameter. A horizontal buttonhole should be roughly the button diameter plus its thickness (commonly diameter + 3 mm). Place the hole so the button sits at the end nearest the garment edge.
- Test on scrap fabric. Stitch a sample buttonhole on the same fabric and interfacing, with the same machine settings, and check that the button passes through snugly before working the real garment.
These are general sewing guidelines; adapt them to your specific pattern, fabric weight and button size.
FAQ
Should the margin be the same top and bottom? This calculator assumes equal margins for symmetry, which suits most garments. If you need different end margins, set the margin to your smaller value and adjust manually.
Does it work in inches? Yes — the math is unit-agnostic. Just enter all values in inches and the spacing will be in inches too.
What if I only have one button? Spacing requires at least two buttons to form a gap. For a single button, just place it at your desired position.